
1. Connect HubSpot and add the card
You need permission to install HubSpot apps and customize record pages. You can create a Checklynx account during setup. The instructions use English menu and button names.
- Open the Checklynx AML Screening listing in the HubSpot Marketplace and select the installation button.
- Choose your HubSpot account, review the permissions and confirm the connection.
- Continue to Checklynx and sign in, or create an account as described below.
New to Checklynx? Create your account:
- Choose the registration option. Use your business email and a password that meets the displayed requirements. You cannot register with a personal address such as Gmail. Contact support if you do not have a business address.
- Verify your email using the instructions in your inbox.
- Enter Company name, First name and Last name to set up your workspace, then select Continue.
- Continue to the pairing page. If you are not redirected there, open HubSpot app settings and select Connect Checklynx for a fresh connection link.
Already have an account? Sign in to the workspace you want to connect. Select that workspace before opening the connection link from HubSpot settings.
On Pair HubSpot with Checklynx, pairing starts automatically for the signed-in workspace. Wait for HubSpot is connected to this Checklynx workspace, then select Return to HubSpot. This opens app settings in a new tab. No API key or separate pairing confirmation is needed.
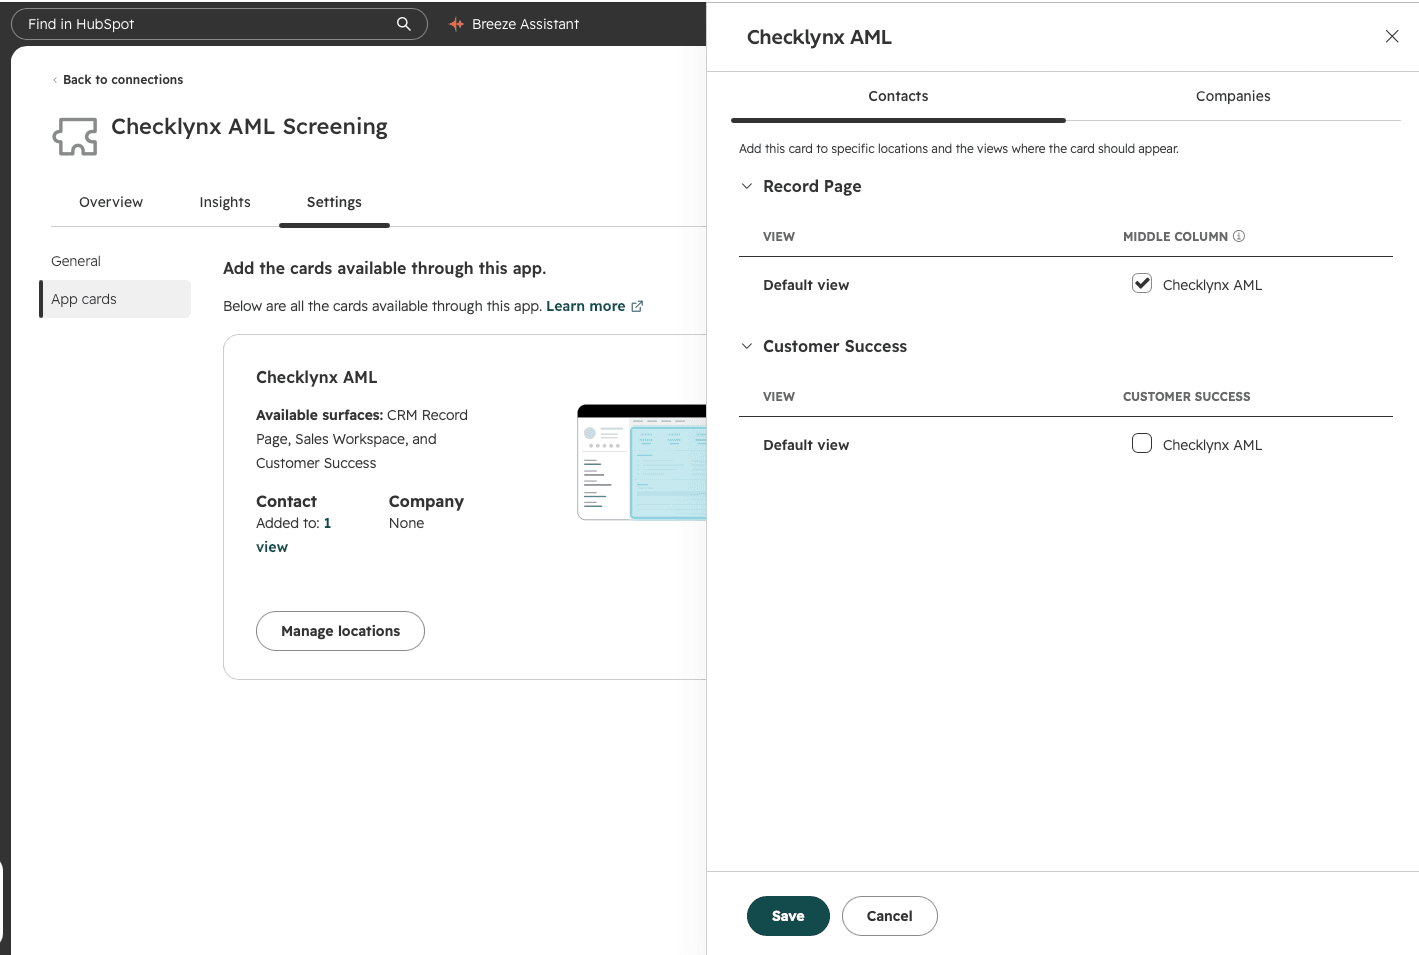
In the HubSpot settings tab that opens, choose where the card appears:
- Open App cards, find Checklynx AML and select Manage locations.
- Select Contacts. Under Record Page, tick Checklynx AML in the Middle column for Default view or the team views you use, then select Save.
- Open Manage locations again and select Companies. Tick Checklynx AML under Record Page > Middle column for the required views, then select Save.
- Open a Contact and a Company record to confirm the card is visible. Configure each object's views separately.
To move the card later, open a record, select Customize, move the existing card within the middle column and select Save and exit.
2. Choose your screening profile
In HubSpot, open Settings > Integrations > Connected Apps > Checklynx AML Screening > Settings > General. If you already have an active profile, select it in Screening and save.
Otherwise, create one:
- Select Manage screening profiles in Checklynx, then Building blocks > Screening profiles > Create screening profile.
- Enter a Name, such as Sanctions. In Sources, select the sanctions source and enable Include source. Add other sources if needed.
- Choose Name screening to check contacts and companies by name. Identity screening requires the relevant identity fields.
- Review Name fuzziness, source filters and any required subtypes, then save.
- Return to HubSpot, use Refresh screening profiles or reload settings, then select and save your default.
Check which sources are enabled before using the profile. Naming it Sanctions does not enable sanctions checks. Review any potential matches in Checklynx.
3. Choose what happens to new records (optional)
In app settings, find When a new record is added. Choose a rule for Contacts and Companies separately:
| What you want | Rule to select |
|---|---|
| A one-time check | Create a Checklynx customer and screen once, then choose Profile for automatic screening |
| Cohort assignment | Create a Checklynx customer and add to a cohort, then choose the cohort (create one in step 4 if needed) |
| No automatic processing | Leave the rule disabled |
Select Save new-record automation. These rules apply only to newly created records. The automatic-screening profile is separate from the default in Screening; save both settings if you configure both.
4. Set up a cohort and automated screening (optional)
Skip this section if you only want one-time checks.
Create a cohort
- Select Manage or create cohorts in Checklynx, or open Cohorts, then select Create cohort.
- Enter a Cohort name. Set Customer type to Entity for companies or Individual for contacts.
- Select Continue. Add existing customers or leave the cohort empty for HubSpot to populate.
- Select Create cohort, wait for Cohort created, then select Done.
- Return to HubSpot, refresh or reload the cohort list, and select it in the appropriate new-record rule.
Activate automated screening
Cohort membership alone does not run checks.
- Open Building blocks > Automated screening > Set up automated screening in Checklynx.
- Under To whom applies?, choose cohort coverage and select your cohort. Under What should be checked?, choose the screening profile.
- Select Continue and review How checks will run. Depending on the source, checks may use Ongoing monitoring, Fixed schedule or Manual screening only. Choose a frequency when requested.
- Review the coverage and select Activate automated screening. Confirm the policy is Active for your cohort.
A fixed schedule is different from continuous ongoing monitoring. Check the customer's status and resulting check; results may take time to appear.
5. Use HubSpot workflows (optional)
Workflows depend on your HubSpot subscription and permissions. For a Contact-based or Company-based workflow:
- Open Workflows, create or edit a workflow, and define its enrollment criteria.
- Select + to add an action and search for Checklynx. Add Create or update Checklynx customer first for an unlinked record.
- Add Request Checklynx check and choose a profile, or Add customer to Checklynx cohort and choose a cohort of the appropriate type.
- Save, review enrollment and activate when ready. Test with one record and confirm the customer, check or cohort assignment in Checklynx.
The check and cohort actions require a linked customer; you do not need to copy customer IDs between actions. Cohort assignment needs an active policy for automated screening. Check the enrollment criteria so you only include the records you intend to process.
Check that it works
Open a Contact and a Company to confirm the card is visible. Test whichever rule or workflow you enabled: confirm the linked customer, completed check or intended cohort assignment. Wait for the check to finish before reviewing its result.
New-record rules do not process existing records. Use the available card actions or the workflow above for those records. Review potential matches in Checklynx before deciding what to do.
Troubleshooting
| Problem | What to check |
|---|---|
| Card missing | Correct object and view, team-specific layouts, saved card placement and customization permissions |
| Profile or cohort missing | Connected workspace, saved item and refreshed settings; companies need Entity cohorts and contacts need Individual cohorts |
| “Screening profile required” | Saved default in Screening, plus the profile selected in any screen-once rule |
| Monitoring inactive | An active policy covering the intended cohort; membership alone is insufficient |
| Check pending or failed | Open the linked customer in Checklynx and inspect the check state; avoid repeatedly submitting checks |
| Settings fail to load | Reload and check the connection state before assuming disconnection |
To restore or change the workspace connection, use Reconnect Checklynx in app settings. To remove the integration, use Disconnect HubSpot and read the confirmation. Checklynx evidence is retained under the applicable retention policy. After reinstalling, check the card locations again.
Need help? Contact support with the time, HubSpot account ID, error and relevant record or check identifiers. Never send passwords, access tokens or authorization codes. See pricing, privacy and terms for service information.
Sources
- Checklynx application: screening profiles, cohorts and automated screening.
- HubSpot knowledge base: account permissions and record customization.